
How To Videos
Creating Department Specific Topics
Using the department specific topic system will allow you to post and distribute department policies, protocols or training that you have produced and that is specific to your department. A good example usage of this area is posting a new protocol that is specific to your department.
Using this system will allow you to post the protocol in HTML, PDF, PowerPoint or even video and make it available to your department members. You can also assign the new topic to your members.
Creating a Subcategory
- Click on the Department Category menu item in the Main Menu area.
- Click the button to create a new subcategory.
- Click on the “New Subcategory” to rename it to an appropriate name like “Protocols” or “Standing Orders”.
- Select the “Active” box when you are ready for your department member to be able to view this new category.
Creating a New Topic by Uploading a PDF
- Click on the Department Specific Category in which you would like to add a new topic/article.
- Click on the “Add Article” Button.
- Give the topic an appropriate name, example: Do Not Resuscitate
- Type in the amount of hours/CEUs this topic is worth. This is for your record keeping only. CE Solutions does not issue CEU credit for Department Specific Topics.
- If you have an MP3 file that you would like your members to have access to, enter the complete URL of the file.
- Click on the “Choose File” button to locate and upload PDF files from your computer or enter the complete URL in the area provided.
- Click “Submit Changes” and then create the exam.
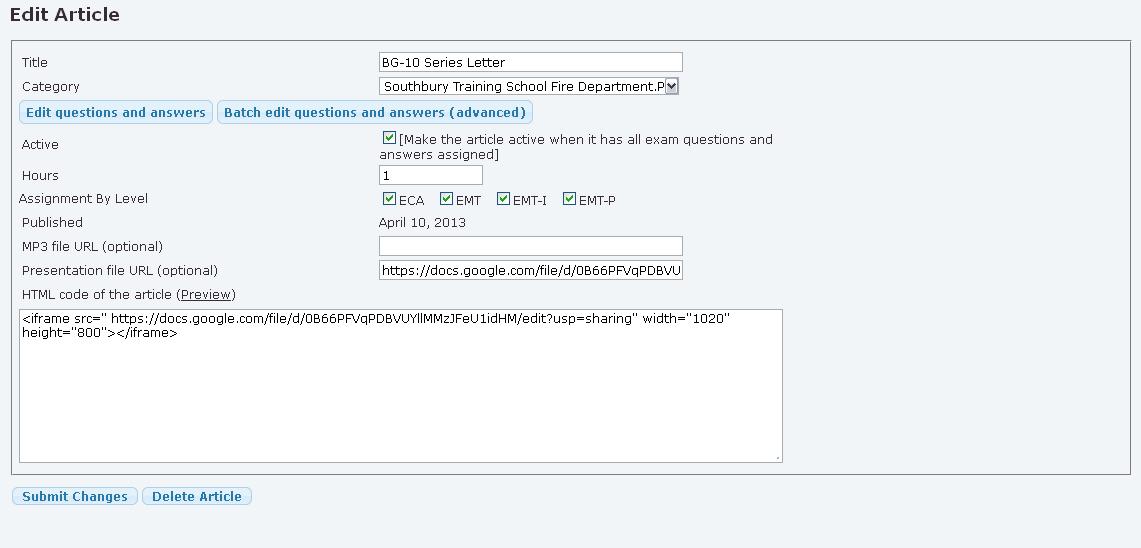
Creating a New Topic Using Google Docs
- Click on the Department Specific Category in which you would like to add a new topic/article.
- Click on the “Add Article” Button.
- Give the topic an appropriate name, example: Do Not Resuscitate
- Type in the amount of hours/CEUs this topic is worth. This is for your record keeping only. CE Solutions does not issue CEU credit for Department Specific Topics.
- If you have an MP3 file that you would like your members to have access to, enter the complete URL of the file.
- If you have a WORD document, PowerPoint, PDF or Video that you would like your members to have access to, enter the complete URL of the file. We suggest that you use Google Docs at http://docs.google.com/ to host your files.
- The next step in creating a new topic is entering the HTML code of the topic. There are numerous HTML editors available and online HTML code generators. If you are using a word document, PDF, video or PowerPoint for your presentation all you need to do is cut and paste the following into the HTML box as this inform your members on how to view the presentation, if you choose not to utilize the HTML:
Please click on the above “Presentation” button to view the topic.
- Click “Submit Changes” and then create the exam.
How to Embed Google Docs
The easiest way to embed Google Docs is by using iframe and you will need to publish it first. Here’s how:
Open the document with the Google viewer and from the File menu in the toolbar, select Publish to the Web. In the window that appears, the Start publishing button. A unique URL is generated. Use this URL to embed the file.
All Google Docs files are assigned with unique URL as an identifier. So we’ll need this unique identifier in order to embed the file.
- Get the unique URL. Open any Google Docs file. To get the URL, you have to publish the files to public. From the top right of that page, click on ‘Share‘ -> ‘Publish As Web Page‘. New page will be opened. Click on the ‘Publish Document’ button. You’ll see the message saying the document has been published such as below.Your document is publicly viewable at: https://docs.google.com/file/d/0B66PFVqPDBVUYllMMzJFeU1idHM/edit?usp=sharing
- We’ll use iframe in order to embed the URL above.
- Finally copy and paste the following code into the HTML code box.
<iframe>src="https://docs.google.com/file/d/0B66PFVqPDBVUYllMMzJFeU1idHM/edit?usp=sharing" width="1020" height="800"</iframe>Creating the Exam
- Click on the “Edit Questions and Answers” button.
- Click on “Add New Question” button.
- Type your question and click on the Add Answer button.
- Type an answer and click on the “Add Answer” button. If this is the correct answer, select the “Correct Radio Button” and then click the “Add Answer” button.
- Continue this process until you have all of your answers, one of which being a correct answer. At this point click on the “Save” button.
- Repeat this process until you have all of your questions. When you are done adding questions click on the “Close Questions” button.
- To publish the article and exam select the active box and click on the “Submit Changes” button.
Notes:
- The article will not be published to your members until there is at least 1 question on the exam. You can use a single True/False question such as “I certify that I have read and understand the City Driving Policy.
- All exam questions are randomly generated and will be in random order.
- Questions are pulled randomly from the question pool and will be completely unique for each user.